本文来源 本文来自官网Vaadin using-web-components
本教程将教您如何使用Web组件并与之交互。我们将构建一个小型UI,将人员添加到数据网格中。
大多数Web组件(如Vaadin组件集)都作为ES模块分发。要有效地使用它们,您需要拥有Webpack,Parcel或Rollup等构建工具。如果您已有一个处理ES模块的现有项目,请随时直接跳到步骤1。
创建和初始化项目 Create and init project 首先创建一个新文件夹并在其中初始化NPM。
1 2 3 $ mkdir webcomponents $ cd webcomponents $ npm init -y (1 )
1 $ npm install --save-dev webpack webpack-dev-server webpack-cli html-webpack-plugin
项目结构 Project structure 在您创建的webcomponents目录中,创建另一个文件夹:src。在其中,创建index.html和index.js。暂时将index.js留空。将以下内容添加到index.html:
src/index.html
1 2 3 4 5 6 7 8 9 <!DOCTYPE html > <html lang ="en" > <head > <title > Webcomponents!</title > </head > <body > Yay! </body > </html >
在项目的根目录中,创建一个webpack配置文件webpack.config.js:
webpack.config.js
1 2 3 4 5 6 7 8 9 10 11 12 13 const HtmlWebpackPlugin = require ('html-webpack-plugin' );module .exports = ({ mode } ) => { return { mode, plugins : [ new HtmlWebpackPlugin ({ template : './src/index.html' }) ], devtool : mode === 'development' ? 'source-map' : 'none' }; };
添加用于运行应用程序的脚本 Add scripts for running the app 在package.json中定义两个NPM脚本,用于运行和构建应用程序。
1 2 3 4 5 "scripts" : { - "test" : "echo \"Error: no test specified\" && exit 1" + "dev" : "webpack-dev-server --env.mode development" , + "prod" : "webpack --env.mode production" },
安装组件 Install the components 使用Web组件的第一步是安装它们。在这种情况下,我们从Vaadin组件集中安装vaadin-text-field,vaadin-button和vaadin-grid。除了组件之外,我们还安装了webcomponentsjs,这是一个用于添加对旧版浏览器的支持的polyfill。
1 $ npm install --save @vaadin /vaadin-text-field @vaadin /vaadin-button @vaadin /vaadin-grid
1 2 3 import '@vaadin/vaadin-button' ;import '@vaadin/vaadin-grid' ;import '@vaadin/vaadin-text-field' ;
为旧版浏览器添加polyfill Add polyfills for older browsers 尽管大多数现代浏览器都内置了对Web组件的支持,但仍然存在使用旧版浏览器的用户。如果您想让他们的应用程序可用,您希望包含在没有本机支持的情况下在浏览器中模拟功能的polyfill。webcomponents.js polyfill附带一个加载程序脚本,可用于仅加载特定浏览器所需的polyfill。它动态加载polyfill,因此不能直接导入由Webpack构建的JS依赖项,而是需要复制依赖项并将加载器包含在索引文件中。该库还包含一个ES5兼容性脚本,以防您将应用程序转换为ES5。
1 $ npm install --save-dev copy-webpack-plugin @webcomponents /webcomponentsjs
复制polyfills Copy polyfills 我们需要做的第一件事是复制polyfill。如果您使用的是与Webpack不同的构建工具,请参阅该工具的文档,了解如何复制静态资产。
webpack.config.js
1 2 3 4 5 6 7 8 9 10 11 12 13 14 15 16 17 18 19 20 21 const HtmlWebpackPlugin = require ('html-webpack-plugin' );+const CopyWebpackPlugin = require ('copy-webpack-plugin' ); module .exports = ({ mode } ) => {return { mode, plugins : [ new HtmlWebpackPlugin ({ template : './src/index.html' }), + new CopyWebpackPlugin ([ + { + context : 'node_modules/@webcomponents/webcomponentsjs' , + from : '**/*.js' , + to : 'webcomponents' + } + ]) + ], devtool : mode === 'development' ? 'source-map' : 'none' }; };
加载polyfill 然后,在index.html的<head>部分中包含加载程序和ES5兼容性脚本的可选导入。
src/index.html
1 2 3 4 5 6 <script src ="webcomponents/webcomponents-loader.js" > </script > <script > if (!window .customElements ) { document .write ('<!--' ); }</script > <script src ="webcomponents/custom-elements-es5-adapter.js" > </script >
使用Web Components构建UI Use Web Components to build the UI 安装组件后,可以像使用任何其他HTML标记一样使用它们。用以下内容替换index.html的正文内容:
src/index.html
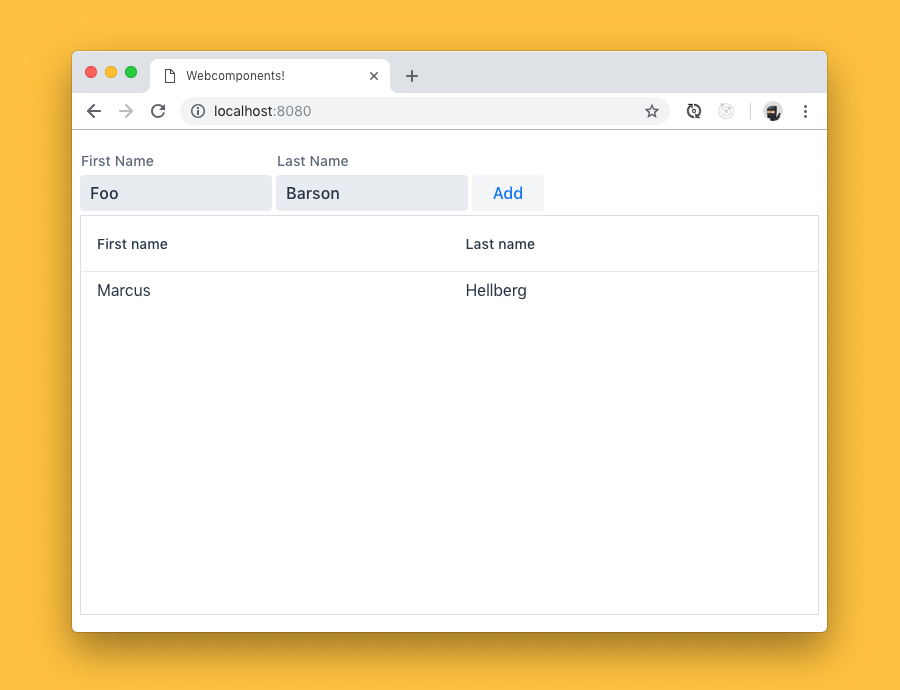
1 2 3 4 5 6 7 8 9 10 11 <div class ="form" > <vaadin-text-field label ="First Name" id ="firstName" > </vaadin-text-field > <vaadin-text-field label ="Last Name" id ="lastName" > </vaadin-text-field > <vaadin-button id ="addButton" > Add </vaadin-button > </div > <vaadin-grid id ="grid" > <vaadin-grid-column path ="firstName" header ="First name" > </vaadin-grid-column > <vaadin-grid-column path ="lastName" header ="Last name" > </vaadin-grid-column > </vaadin-grid >
侦听事件并更新属性 Listen for events and update properties 现在我们已经准备好了所有的UI构建块,下一步就是添加一些功能。
首先在index.js中添加一个调用函数initUI()的load事件监听器。
src/index.js
1 2 3 window .addEventListener ('load' , () => { initUI (); });
1 2 3 4 5 6 7 8 9 10 11 12 13 14 15 16 17 18 19 20 21 function initUI ( const firstNameField = document .querySelector ('#firstName' ); const lastNameField = document .querySelector ('#lastName' ); const addButton = document .querySelector ('#addButton' ); const grid = document .querySelector ('#grid' ); let people = []; addButton.addEventListener ('click' , e => people = [ ...people, { firstName : firstNameField.value , lastName : lastNameField.value } ]; grid.items = people; firstNameField.value = '' ; lastNameField.value = '' ; }); }
总结和后续步骤 Summary and next steps 导入后,Web Components的行为与任何其他HTML元素相同。您可以设置和读取数据的属性和属性,并侦听事件以添加交互性。
Web组件旨在独立于框架。您可以将它们与框架或模板库一起使用,以减少手动查询元素和设置其值的样板。有关详细信息,请参阅我们在常用框架中使用Web组件的任何其他指南。
 wechat
 alipay